Starting a blank Jekyll site with Tailwind CSS in 2022
Most websites I build start off as a blank Jekyll site with Tailwind CSS on top.
It’s definitely no rocket science, but every now and then things don’t go so smooth: a new device, something out of date, something I forgot.. So I decided to document the process as a detailed guide to help me, or someone else, when that happens.
I tried to keep it beginner-friendly, so if you are a seasoned developer, don’t be surprised if you see me telling you things like how to add a line to a file from terminal, or that you should be using git.
UPDATE: I made a Jekyll + Tailwind boilerplate based on this guide. It will save you some time with fresh projects. Adding Tailwind CSS to an existing Jekyll site? Read on ⤵
0. Development environment:
If this is the first time you are building a Jekyll website on your machine, you might want to check out the official Jekyll documentation regarding the prerequisites.
Here’s my current development environment:
- macOS 12.2.1
- Ruby 3.1.1
- Bundler 2.3.7
- Jekyll 4.2.2
- Node.js 16.14.2
The differences with the minor [x.x.X] and patch [x.X.x] version numbers shouldn’t matter but with the major [X.x.x] numbers might.
1. Start a new Jekyll project
Let’s create a little static website called UpToDate. Run this in your terminal:
jekyll new uptodate --blank
cd uptodate
2. Set up Git:
In your terminal, run:
git init
In the root directory of your project create a file named .gitignore and paste
the following in it:
_site/
.sass-cache/
.jekyll-cache/
.jekyll-metadata
node_modules
3. Install Ruby gems
The --blank flag makes things really blank, so the Gemfile needs to be
created manually. Add a file named Gemfile to the root directory with the
following content:
source 'https://rubygems.org'

gem 'jekyll'
gem 'webrick'
Now let Bundler install those gems. In your terminal, run the install command:
bundle
If you see a message starting with “Bundle complete!”, it means everything went according to the plan. Let’s confirm this by firing up the Jekyll server from terminal:
bundle exec jekyll serve
Open localhost:4000 in your browser. You should see something like this:

4. Add PostCSS
In order to use Tailwind CSS, we first need to install and configure PostCSS.
Let’s install the PostCSS gem for Jekyll. Run the following in your terminal:
echo "gem 'jekyll-postcss'" >> Gemfile
bundle
For this plugin to work properly, some changes need to be made in Jekyll
configuration. Open the _config.yml file and add the following lines at the end:
plugins:
  - jekyll-postcss

postcss:
  cache: false
Disabling cache is needed for Tailwind CSS’s JIT engine. Without this, the server would need to restart after each change.
Now create a postcss.config.js file in the root directory and paste the
following in it:
module.exports = {
  plugins: [
    require('tailwindcss'),
    require('autoprefixer'),
    ...(process.env.JEKYLL_ENV == 'production'
      ? [require('cssnano')({ preset: 'default' })]
      : [])
  ]
}
Autoprefixer and cssnano packages are optional, but they are recommended for production builds.
Pssst! Blogging on a static site? Collecting visitor emails has just gotten easier than ever with:
👉 weightless.so 🪶Setting it up takes ~90 seconds and $0 USD
This is not a paid ad, it's a free one: Weightless is built by me 👋
Now let’s install those packages. I use Yarn (NPM is fine as well):
yarn add postcss@latest tailwindcss@latest autoprefixer@latest cssnano@latest -D
5. Add Tailwind CSS, finally
First create a tailwind.config.js file in the root directory with the following contents:
module.exports = {
  content: [
    './_drafts/**/*.html',
    './_includes/**/*.html',
    './_layouts/**/*.html',
    './_posts/*.md',
    './*.md',
    './*.html',
  ],
  theme: {
    theme: {
      extend: {},
    },
  },
  plugins: []
}
The above config lets Tailwind know where its utility classes might be located. If you add new directories for your posts, pages, or partials, you will need to update the content array accordingly.
By default, Jekyll works with SASS so we need to make a couple more changes.
Locate the assets/css/main.scss file and change its extension from .scss to .css.
Unless you’re planning to use SASS, you might want to delete the _sass directory.
Now open assets/css/main.css and change its content to the following:
---
---

@tailwind base;
@tailwind components;
@tailwind utilities;
Note those hyphens at the beginning. That’s YAML front matter and our main css file must start with it.
Once again, let’s confirm everything’s working as intended. Start the Jekyll server, or if it’s already running, restart it:
bundle exec jekyll serve --livereload
Open localhost:4000 in your browser.
Things should look a little bit different from what we last saw, and a keen eye might even recognize Tailwind Preflight at play, stripping the browser default styles, but of course we need to make things red to be super sure.
Open _layouts/default.html and add class="text-red-500" attribute to the
<body> tag. Now switch back to your browser. Since we used the --livereload
flag, you should be seeing this already:

YES? Congrats! You are ready to use Tailwind CSS in your project 🥳
6. Bonus content: production deployment
6.1. Netlify
Netlify is my favorite tool when it comes to hosting static sites. For some reason, their default settings for deploying Jekyll sites seem to not play that well with my guide above.
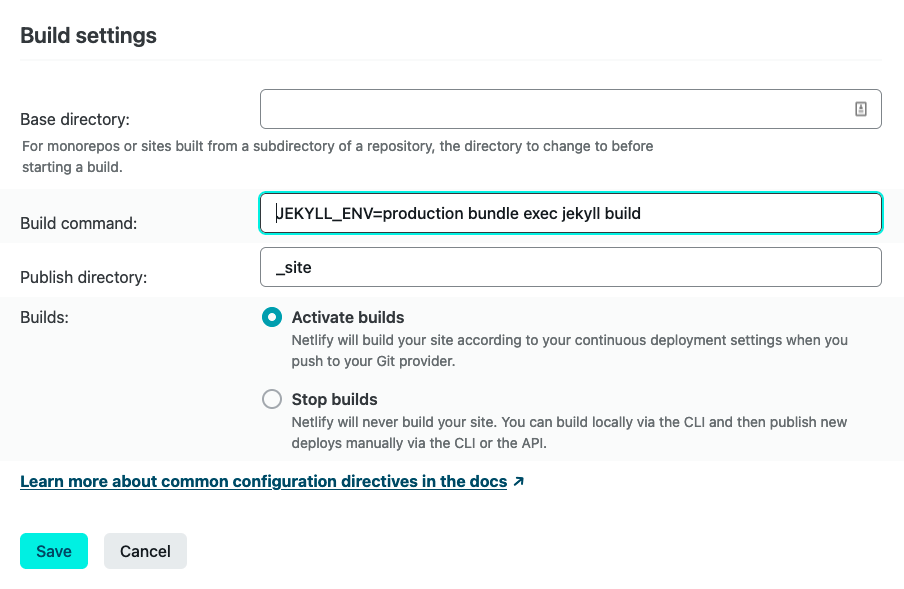
If you experience any issues related to PostCSS during deploy, specifying
JEKYLL_ENV in the build command might help. Instead of the Netlify-provided
bundle exec jekyll build, use JEKYLL_ENV=production bundle exec jekyll build.
My build settings look like this, and it works:

6.2. GitHub Pages
If you set up your Tailwind CSS + Jekyll website according to this guide and you now wish to host it on GitHub Pages, it won’t work out of box. Long story short, you need to do it via GitHub Actions.
Luckily, I wrote about that as well.